Friday, February 27, 2015

Toffee squares and the Oscars

Toffee squares / Quadradinhos de biscoito com chocolate e amêndoa

This year I felt less prepared for the Oscars compared to previous years, for I did not watch many of the movies, but it was a lot of fun anyway – I had my favorites even among the movies I hadn’t watched.

Michael Keaton did not take the award home, unfortunately – it is hard to compete with an Oscar-bait role as the one played by Eddie Redmayne – but it was pure joy to see Alejandro Iñarritú up on the stage so many times (too bad the most important award of the evening was delivered by an idiot).

I still haven’t watched Whiplash and Boyhood, but loved both Patricia Arquette and J. K. Simmons’ wins, and their speeches as well – Patricia kicked serious ass with that speech, didn’t she? And so did Graham Morton.

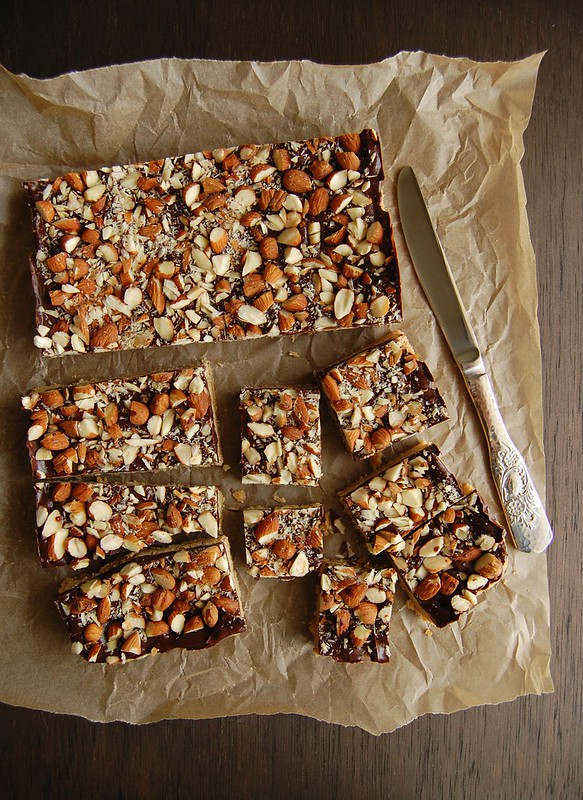
The weekend is upon us and I’ll try to catch up on the Oscar movies I haven’t seen yet, and nothing better than a little tasty something to go with the movie session: these bars are easy to make and you probably have all the ingredients at home.

Toffee squares
slightly adapted from Epicurious

Crust:
1 cup (2 sticks/226g) unsalted butter, at room temperature
1 cup (175g) firmly packed light brown sugar
1 large egg yolk
1 teaspoon vanilla extract
1/8 teaspoon table salt
2 cups (280g) all-purpose flour

Topping:
280g (10oz) dark chocolate, chips or finely chopped – the one I used has 53% cocoa solids
1 ¼ cups almonds, toasted, cooled then coarsely chopped

Crust: preheat the oven to 180°C/350°F. Lightly butter a 22x32cm (9x13in) baking pan, line it with foil and butter it as well – I used a 20x30cm (8x12in) pan.

In a large bowl, with an electric mixer, beat together the butter and sugar on medium speed until light, about 2 minutes. Beat in the egg yolk, vanilla, and salt. Turn off the mixer, add all the flour at once then mix on low speed just until a dough forms – it will be stiff. Pat the dough evenly over the bottom of the baking pan – I used a small spatula to spread the dough onto the pan and thought it made the job a lot easier. Prick the dough all over with a fork.
Bake in the center of the oven until pale gold on top, 20-30 minutes.

Remove the pan from the oven and scatter the chocolate pieces evenly over the crust. Return the pan to the oven for 1 minute. Remove the pan again and, using a knife or spatula, spread the chocolate evenly over the crust. Sprinkle evenly with the almonds, then press lightly with your fingertips to make sure they stick to the chocolate layer.

Let cool completely in the pan on a wire rack*. Using a sharp knife, cut into small squares, then carefully remove from the pan.

* my chocolate did not set at room temperature, so I refrigerated the bars for 1 hour to make it firmer (but don’t leave them too long in the fridge before cutting for it will be difficult to slice through the base)

Makes 24

Monday, February 23, 2015

Moist coconut cake - a recipe straight from the 80s

Bolo toalha felpuda / Moist coconut cake

I was a kid in the 80s and back then there was a time when every birthday cake was the same here in São Paulo (I’m not sure it happened in other parts of the country): it was a very moist coconut cake, drenched in sweetened condensed milk – Brazilian desserts tend to be very sweet and we are crazy about sweetened condensed milk – cut into squares and wrapped individually in a piece of foil; the pieces would then go into a large Styrofoam box, decorated accordingly to the theme of the party.

I know that might sound a bit weird for non-Brazilians, but that kind of cake was all the rage here for years. And if you think that is strange, wait till you hear how the cake is called: toalha felpuda, something that can be translated like “fluffy towel”.

:D

My sister-in-law was talking about this cake the other day, of how much she wanted to eat it and all, and since I’m more than willing to make sweets for people I like I told her I would make a toalha felpuda especially for her: it turned out moist and fluffy, just as I remembered from my childhood, but I ditched the foil wrapping and placed the cake squares in an airtight container – it can be served at room temperature or chilled, like in the good old days.

Moist coconut cake (toalha felpuda)
slightly adapted from Nestlé’s Brazilian website

Cake:
2 cups (280g) all purpose flour
1 tablespoon baking powder
150g unsalted butter, softened
1 ¾ cups (350g) granulated sugar
4 eggs, separated
1 teaspoon vanilla extract
½ cup (120ml) whole milk, room temperature
200ml coconut milk
pinch of salt

Topping:
1 cup (100g) desiccated unsweetened coconut
½ cup (120ml) whole milk, room temperature
1 can (395g) sweetened condensed milk

Cake: preheat the oven to 180°C/350°F. Butter and flour a 23x32cm (13x9in) metal pan*.

In a medium bowl, sift together flour and baking powder. Set aside.
Using an electric mixer, cream butter and sugar until light and fluffy. Beat in the yolks, one at a time, beating well after each addition. Scrape the sides of the bowl occasionally. Beat in the vanilla. On low speed, beat in the sifted ingredients in three additions, alternating with the milk and coconut milk (one addition each). In a clean bowl, whisk the egg whites with the salt until firm peaks form. Fold the egg whites gently into the cake batter. Pour batter into prepared pan and bake for about 40 minutes or until risen and golden and a skewer inserted in the center of the cake comes out clean.

While the cake is baking, start making the topping: in a medium bowl, stir together the coconut and the milk and leave to hydrate. When the cake is baked, add the sweetened condensed milk to the coconut and milk mixture and stir to combine. As soon as the cake is out of the oven, prick it all over with a fork and pour over the topping, gradually, until the cake absorbs all of it. Cool completely, then cut into squares to serve.

* I made the exact recipe above using a 20x30cm (8x12in) baking pan and baked the cake for 55 minutes

Makes 24

Friday, February 20, 2015

Toasted oat, cherry and hazelnut cookies, Michael Keaton again and the readers

Toasted oat, cherry and hazelnut cookies / Cookies de aveia e avelã tostadas e cerejas secas

I know I’ve told you several times already that I love having a food blog and I’ve given you lots of reasons for that, but what can I do if that is the absolute truth? My readers keep on giving me joy and I apologize for being sounding like a broken record. :)

Days ago I posted on the Facebook that I now that I have two baby nephews I started browsing baby clothes in department stores and got so mad because 90% of them are for girls – it was a matter of moments before many readers commented that they had boys, too, and agreed with me, and others even recommended websites in which I can find more options. How great is that? I mean, I have a food blog but I can write about anything I want and get a nice response from the readers.

Something else that I love is when they see something cool and think of me: today, for instance, a reader sent me this link because of my love for Birdman and I laughed so hard I had tears in my eyes – I am now, more than ever, hoping that Michael Keaton takes the award home next Sunday. Thank you, Andreza! I loved the video!

I get such nice messages and they surely make me want to go on writing on this blog and bringing you good, delicious recipes – the cookies I bring you today are like a tasty version of granola bars and they can be adapted to your liking: the hazelnuts and dried cherries can be replaced by other nuts and dried fruit, such as almonds, Brazil nuts, dried apricots, raisins… I even think that rye flour could be used here – its nuttiness would go beautifully well with the flavor of the hazelnuts.

Toasted oat, cherry and hazelnut cookies
slightly adapted from the oh, so beautiful Scandilicious Baking

150g rolled oats
50g flaked hazelnuts
100g all purpose flour
50g whole wheat flour
¾ teaspoon baking powder
¼ teaspoon baking soda
¼ teaspoon ground cinnamon
1/8 teaspoon table salt
125g unsalted butter, softened
100g light brown sugar
50g granulated sugar
1 egg
1 teaspoon vanilla extract
100g sour cream*
75g dried cherries, halved if too large

Preheat the oven to 180°C/350°F. Place the oats and hazelnuts in a medium baking pan and roast for 10 minutes, stirring halfway through. Cool (turn off the oven).

In a medium bowl, whisk together the flours, baking powder, baking soda, cinnamon and salt. Using an electric mixer, cream butter and sugars until light and creamy. Beat in the egg. Scrape the sides of the bowl. Beat in the vanilla. Using a rubber spatula, fold in the flour mixture, sour cream, oats and hazelnut and cherries and stir just until incorporated. Cover and refrigerate for 45 minutes.

Preheat the oven to 180°C/350°F. Line two large baking sheets with baking paper.
Using 2 leveled tablespoons of dough for each cookie, drop batter onto prepared sheets 5cm (2in) apart. Bake cookies until the edges are golden brown and the centers are still slightly soft, 12-14 minutes.
Let cookies cool for 5 minutes on the baking sheet, then slide the paper with the cookies onto a wire rack and cool completely.

* homemade sour cream: to make 1 cup of sour cream, mix 1 cup (240ml) heavy cream with 2-3 teaspoons lemon juice in a bowl. Whisk until it starts to thicken. Cover with plastic wrap and leave at room temperature for 1 hour or until thicker (I usually leave mine on the counter overnight – except on very warm nights – and it turns out thick and silky in the following morning; refrigerate for a creamier texture)

Makes 28

Sunday, February 15, 2015

Devil’s food loaf

Devil's food loaf / Bolo de chocolate (Devil's food loaf)

I’ve told you already that I’m not easily seduced by chocolate cakes, but sometimes I feel like making nothing but something with chocolate and when that happened last I remembered Annie Bell’s amazing chocolate Victoria sponge cake I made years ago and I knew that if I made one of her recipes I would be glad with the result.

I love how certain authors automatically come to my mind when I want something very specific.

The result was indeed really good: this is a much simpler cake, made in a loaf pan and with a rich and delicious glaze that transforms the cake into a wonderful dessert. One could, of course, omit the glaze for a tea time treat and serve the cake with some icing sugar on top only – that would still get you a great cake, I guarantee. But if you want something slightly more decadent, to finish up a dinner or to go with a movie session, go ahead and prepared the glaze, too – I am sure you won’t regret it.

Annie Bell writes for The Daily Mail, and I highly recommend you check her recipes out.

Devil’s food loaf
slightly adapted from Annie Bell

Cake:
½ cup (45g) unsweetened cocoa
¾ teaspoon baking soda
3 medium eggs*
1 1/3 cups (233g) brown sugar, packed
½ cup (120ml) canola oil
1 teaspoon vanilla extract
1 cup (140g) all purpose flour
1 teaspoon baking powder
pinch of salt

Frosting:
60g dark chocolate, chopped – I used one with 70% cocoa solids
1 tablespoon (14g) unsalted butter
2 tablespoons unsweetened cocoa, sifted
2 tablespoons whole milk
½ tablespoon honey

Lightly butter a 20x10cm (8x4in) loaf pan, line it with paper and butter the paper as well. Whisk the cocoa with 100ml boiling water in a small bowl using a small whisk, then whisk in the baking soda and leave to cool for about 20 minutes – in the meantime, preheat the oven to 180°C/350°F.

Whisk together the eggs, sugar and oil in a large bowl using an electric whisk until smooth and combined. Whisk in the vanilla. Sift the flour, baking powder and salt over the mixture and stir. Stir the cocoa mixture. Pour into the pan and give it a couple of taps on the work surface to bring up any bubbles. Bake for about 1 hour or until the cake is risen and a skewer inserted at the centre comes out clean. Run a knife around the edge of the cake, leave for 10 minutes and then carefully unmold onto a wire rack to cool. Once cooled, peel off the paper and place onto a serving plate.

For the frosting, gently melt the chocolate with the butter in a medium bowl set over a saucepan of simmering water. At the same time combine the cocoa, milk and honey in a small saucepan and heat almost to boiling point, giving it a whisk. Pass this through a sieve into the bowl with the melted chocolate and whisk to a thick, glossy icing. The icing can set quickly so should be used straight away (but if necessary you can rewhisk it in the bowl over the heat with a teaspoon or two of water).

Smooth the glaze over the top of the cake, taking it to the edge and letting it drip down. Set aside for a couple of hours for the frosting to set.

The cake will keep well in a covered container for several days.

* since I only had large eggs at hand, I selected the smallest I could find to use in this recipe

Serves 6-8

Wednesday, February 11, 2015

Lime lavender bars and becoming an auntie once again

Lime lavender bars / Barrinhas de limão taiti e lavanda

Days ago I became an auntie once again: my brother’s baby arrived in this world and made us all very, very happy! <3

My nephew is adorable and I got to hold him for a long time yesterday. I fed him and he then fell asleep in my arms – best feeling ever. I came home with my heart full of love and joy and feeling incredibly inspired, so I went to the kitchen and cooked and baked a bit. These lime lavender bars were one of the recipes I tried and they turned out really good, the lavender adding a different dimension to the citrus flavor.


I’m feeling very inspired, still, and there are other delicious recipes I want to make – in the meantime, I’ll leave you with the bars while I miss my nephew every second of the day: I cannot wait to hold the little one in my arms again. <3

Lime lavender bars
adapted from two great cookbooks: The Beekman 1802 Heirloom Dessert Cookbook: 100 Delicious Heritage Recipes from the Farm and Garden and Chewy Gooey Crispy Crunchy Melt-in-Your-Mouth Cookies by Alice Medrich

Crust:
¾ teaspoon dried lavender
¼ cup (50g) granulated sugar
½ cup (113g/1 stick) unsalted butter, melted
¾ teaspoon vanilla extract
¼ teaspoon salt
1 cup (140g) all purpose flour

Topping:
finely grated zest of 2 large limes
1 cup (200g) granulated sugar
3 tablespoons all purpose flour
3 eggs
½ cup (120ml) freshly squeezed lime juice
pinch of salt
½ teaspoon vanilla extract
powdered sugar for dusting

Preheat oven to 180°C/350°F. Lightly butter a 20cm (8in) baking pan and line it with aluminum foil leaving an overhang on two opposite sides. Butter the foil.

Start with the crust: in a pestle and mortar, pound together the lavender and sugar until the buds are smaller in size. Transfer to a medium bowl, add the melted butter, vanilla, salt and flour and mix until just incorporated. Press dough evenly over bottom of pan. Bake for 25-30 minutes, or until crust is fully baked, well-browned at the edges and golden brown in the center.

Topping: in a large bowl, rub together zest and sugar until fragrant. Stir in the flour. Whisk in eggs. Stir in juice, vanilla and salt. When crust is ready, reduce heat to 150°C/300°F, slide rack with pan out and pour filling onto hot crust. Bake for about 20 minutes longer, or until topping no longer jiggles when pan is tapped.

Remove from oven to a wire rack to cool completely. Dust with icing sugar, cut into bars and serve.
Stored in an airtight container, bars can be refrigerated for up to 3 days.

Makes 16

Sunday, February 8, 2015

Ginger twist

Ginger twist / Pão trançado de gengibre

I’ve asked my readers over at the blog’s Facebook page if they like to cook and bake on weekends and what they like to make – I love being in the kitchen on weekends because it is when I have more time and get to make more complex things, recipes that take a while to be ready or/and have many steps, such as this ginger twist.

Spending a lot of time in the kitchen can be frustrating if the results aren’t what we expect – and trust me, I’ve been there many times – but in this recipe’s case every bit of work and every second were worth it: the bread looked beautiful and tasted amazing, too.

It is a bit time consuming, I won’t lie, but I recommend you bookmark it for a cold, rainy day when you’re not at all interested in going out – just imagine that after all the work you’ll have something this delicious to go with a cup of tea or coffee. :D

Ginger twist
slightly adapted from the always amazing Gourmet Traveller

Dough:
140ml lukewarm whole milk
2 ½ teaspoons dry yeast
120g granulated sugar
400g all purpose flour
50g whole wheat flour
2 teaspoons ground ginger
1 teaspoon ground cinnamon
finely grated zest + juice of 1 orange
2 eggs, room temperature
100g unsalted butter, softened
1 egg, extra, for brushing the loaf

Filling:
70g unsalted butter, softened
50g brown sugar
50g granulated sugar
1 teaspoon ground ginger
130g pecans, chopped
100g almonds, chopped

Topping:
1 tablespoon all purpose flour
1 tablespoon granulated sugar
1 tablespoon (14g) unsalted butter, cold

Dough: stir milk, yeast and a pinch of the sugar in a small bowl to dissolve and stand until foamy (5 minutes). Meanwhile, combine dry ingredients and zest with a pinch of salt in an electric mixer fitted with a dough hook. Add yeast mixture, 2 eggs and orange juice, then mix on medium speed to form a soft dough. Gradually add butter, beating on medium speed to form a soft dough, then transfer to a buttered bowl, cover with plastic wrap and stand in a warm place until doubled in size (1 hour).

Filling: mix all the ingredients together and refrigerate until needed. Set aside 30g of the filling for the topping.

Knock back dough on a well-floured surface, roll out to a 30x60cm (12x24in) rectangle and spread evenly with filling. Roll from the longest side to form a cylinder, then cut in half. Twist each half around one another to form a rope and place in a buttered 12x25cm (5x10in) loaf tin. Stand until slightly risen (30 minutes) – in the meantime, preheat oven to 180°C.

Using your fingertips, mix the 30g reserved filling with the topping ingredients until a crumble forms. Refrigerate until needed.

Beat the extra egg with a pinch of salt and brush loaf with the mixture. Scatter with the topping and bake until golden and risen (45 minutes to 1 hour). Cover with foil if loaf gets too dark. Cool in the pan for 10 minutes, then carefully unmold onto a rack to cool.

Serves 8-10

Friday, February 6, 2015

Cherry and white chocolate brownies

Dried cherry and white chocolate brownies / Brownies com chocolate branco e cerejas secas

As a person who loves to feed other people, I offer to bring dessert whenever I’m invited to someone’s house for a meal. Brownies are always a good idea for everyone loves them, and if there are many mouths to feed I make a big batch using a 20x30cm (8x12in) pan, that way everyone can have seconds if they want to.

I have a big appetite for sweets and tend to believe that everyone else does, too. :D

I made these for a barbecue ages ago and they were a hit: very fudgy – I don’t think that calling them “creamy” would be wrong – with a nice balance between the sweet from the white chocolate and the sour from the cherries.

Cherry and white chocolate brownies
slightly adapted from the delicious Better Homes and Gardens Baking: More than 350 Recipes Plus Tips and Techniques

200g unsalted butter
170g dark chocolate, finely chopped – I used one with 53% cocoa solids
1 ½ cups (300g) granulated sugar
4 large eggs
2 teaspoons vanilla extract
1 1/3 cups (185g) all purpose flour
½ teaspoon baking soda
pinch of salt
1 cup (170g) white chocolate chips
1 cup (145g) dried cherries, chopped if too large

Preheat the oven at 180°C/350°F. Lightly butter a 20x30cm (8x12in) baking pan and line with foil, leaving an overhand in two opposite sides. Butter the foil as well.

In a large saucepan, melt the butter and chocolate together over low heat. Cool slightly.
Whisk in the sugar, then the eggs, one at a time. Whisk in the vanilla. Stir in the flour, baking soda and salt. Stir in white chocolate and cherries. Spread the batter evenly into the prepared pan.
Bake until a skewer inserted into the middle of the brownies comes out with a moist crumb, 25-30 minutes.
Cool completely in the pan over a wire rack. Cut into squares to serve.

Makes 24

Tuesday, February 3, 2015

Maple cake - simple and delicious

Maple cake / Bolo de xarope de bordo

When I started blogging, a good eight years ago, there were several ingredients I saw in my foreign cookbooks that I could not find here in Brazil, and some were too expensive – so I kept some recipes in the back of my head for a long time, just waiting for an opportunity to try them someday.

Things have changed and now many ingredients have become available here, and some of the prices have dropped a bit, too. The two times I visited NYC I brought home huge bottles of maple syrup for it was very expensive here and not easy to find, but lately I’ve seen it everywhere for a more affordable price – I even brought home a small bottle since the ones from NY are long gone.

This cake is delicious and it was a great way of using my precious maple syrup – I wasn’t too keen on the icing, though, for I thought it was too sweet. I would definitely make this cake again, but I’d serve it with a dusting of icing sugar and nothing more.

Maple cake
from the delicious Martha Stewart's Cakes: Our First-Ever Book of Bundts, Loaves, Layers, Coffee Cakes, and more

Cake:
1 cup (2 sticks/226g) unsalted butter, room temperature
2 ½ cups (350g) all-purpose flour
2 teaspoons baking powder
½ teaspoon baking soda
¼ teaspoon table salt
¾ cup (180ml) maple syrup
½ cup (100g) granulated sugar
2 large eggs
1 teaspoon vanilla extract
¾ cup (180ml) sour cream*

Icing:
1/3 cup (80ml) pure maple syrup, plus more if needed
3 tablespoons unsalted butter, melted
2 ½ cups (350g) confectioners' sugar, plus more if needed

Make the cake: preheat oven to 180°C/350°F. Butter a 23cm (9in) round cake, line the bottom with a circle of baking paper and butter it as well.

In a medium bowl, whisk together flour, baking powder, baking soda, and salt.
With an electric mixer on medium speed, beat butter, maple syrup, and granulated sugar until pale and fluffy, 3-5 minutes. Add eggs, one at a time, beating well after each addition; mix in vanilla.
Reduce mixer speed to low. Add flour mixture in 3 batches, alternating with 2 batches of sour cream; beat until just combined. Transfer batter to prepared pan; smooth top with an offset spatula. Bake until a cake tester comes out clean, about 40 minutes. Transfer pan to a wire rack to cool 25 minutes. Turn out cake onto rack to cool completely.

Icing: combine maple syrup and butter in a bowl. Sift in confectioners’ sugar, and whisk until combined. Adjust consistency with more syrup or sugar, if necessary. Spread maple icing over top of cake. Let set, at least 15 minutes, before serving.

* homemade sour cream: to make 1 cup of sour cream, mix 1 cup (240ml) heavy cream with 2-3 teaspoons lemon juice in a bowl. Whisk until it starts to thicken. Cover with plastic wrap and leave at room temperature for 1 hour or until thicker (I usually leave mine on the counter overnight – except on very warm nights – and it turns out thick and silky in the following morning; refrigerate for a creamier texture)

Serves 8-10

Related Posts with Thumbnails